Walletbeat wallet testing: L1 Provider Independence
This guide describes how to set up a wallet with a custom L1 RPC provider such as a self-hosted node, and ensuring it can provide basic functionality without reliance on a specific external RPC provider.
Why?
This analysis is necessary to ensure that the wallet meets the walk-away test, specifically around the way it interacts with the chain. Most wallets come with a default external RPC provider for interacting with L1, rather than connecting to a user’s full node. This means users are at the mercy of this RPC provider to obtain accurate chain data and to interact with the chain for many operations including balance lookups, transaction submission, etc. They may also rely on non-Ethereum-API services for additional services such as transaction simulation, estimating a transaction’s gas cost, price quotation lookups, etc. These are nice features to have but come at a cost for user privacy and self-sovereignty. For this reason, Walletbeat aims to ensure that users always have the option use their self-hosted node for L1 interactions, and that the wallet’s basic functions can still work without any external service other than said node.
High-level guide
To test wallets on this, we will run wallets in such a mode that:
- Only traffic to the user’s configured L1 RPC endpoint is permitted; all the rest of the network requests will fail.
- This ensures that any non-Ethereum-API external service remains optional.
- All traffic to the L1 RPC endpoint will go through a whitelist that ensures that only plain Ethereum API calls are used.
- This ensures that the wallet’s behavior is consistent when using a self-hosted node as it would be when using its default L1 RPC provider.
And we will test the following operations:
- Account creation (if it is possible to configure the L1 RPC endpoint prior to account creation)
- Balance lookups for Ether and an ERC-20 token
- ERC-20 token sends
Step-by-step
Step 0: Set up mitmproxy
Set up mitmproxy as explained in this guide.
Step 1: Run mitmproxy with the JSON-RPC filter add-on
Edit src/tools/rpc-filtering-proxy/jsonrpc_filter.py’s ALLOWED_DOMAINS set with your desired RPC endpoint domain. This will make mitmproxy deny any request (including any web traffic!) to endpoints other than the JSON-RPC endpoint you want, and will deny any JSON-RPC method other than the ones that are part of the Ethereum API.
$ mitmdump \
    --listen-port 8080 \
    --mode regular \
    --set upstream_cert=false \
    --set http2=false \
    -s src/tools/rpc-filtering-proxy/jsonrpc_filter.py
Step 2: Create a dedicated browser or device for wallet testing
In order to eliminate noise from the network capture you are about to do, it is imperative to use a dedicated browser or mobile device for wallet testing.
- For browser extension wallet testing: The easiest way is to use a different profile. Different browsers have different ways to do this. For Chromium, run
chromium --user-data-dir=/tmp/walletbeat-test-browserin your terminal. This will launch a dedicatedchromiumbrowser that lives completely separately from whatever other browser you may otherwise use. All browser-related files will be stored in/tmp/walletbeat-test-browser, all settings will be unique to this browser, and all extensions will apply to this browser only.
- For mobile app wallet testing: The easiest way is to use an emulated Android device using Android Studio. Create a new emulated device for the purpose of wallet testing.
Step 3: Download and install the wallet
Install the wallet in the browser/device as normal. Do not set up an account, and do not change any wallet settings yet.
Step 4: Set up your browser or device to use the proxy
Once the wallet is installed, shut down the browser or device, and restart it with the correct proxy settings. You will need to configure your device to use http://127.0.0.1:8080 (or whichever port you used) as a proxy. This is browser-dependent (or device-dependent).
- For browser extension wallet testing: Set your browser’s proxy settings. This is usually located in the settings. If using a dedicated
chromiumprofile from earlier, you can also specify it on the command line:chromium --user-data-dir=/tmp/walletbeat-test-browser --proxy-server=http://127.0.0.1:8080 - For mobile app wallet testing: Go to the Android Studio’s settings for the emulated device (not the “Settings” app inside the emulated device itself), and you can set device-wide proxy configuration here:
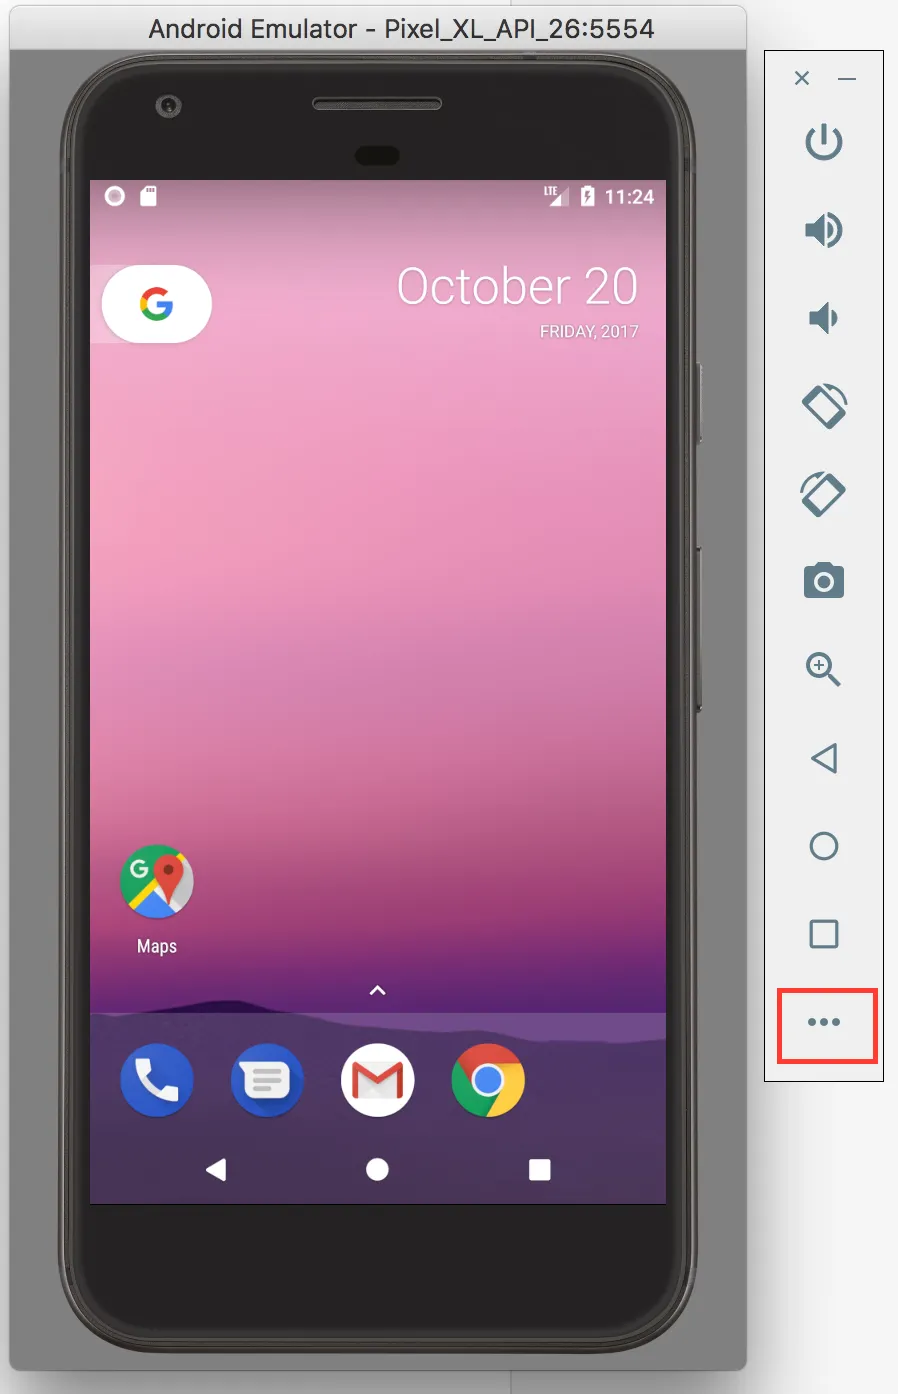
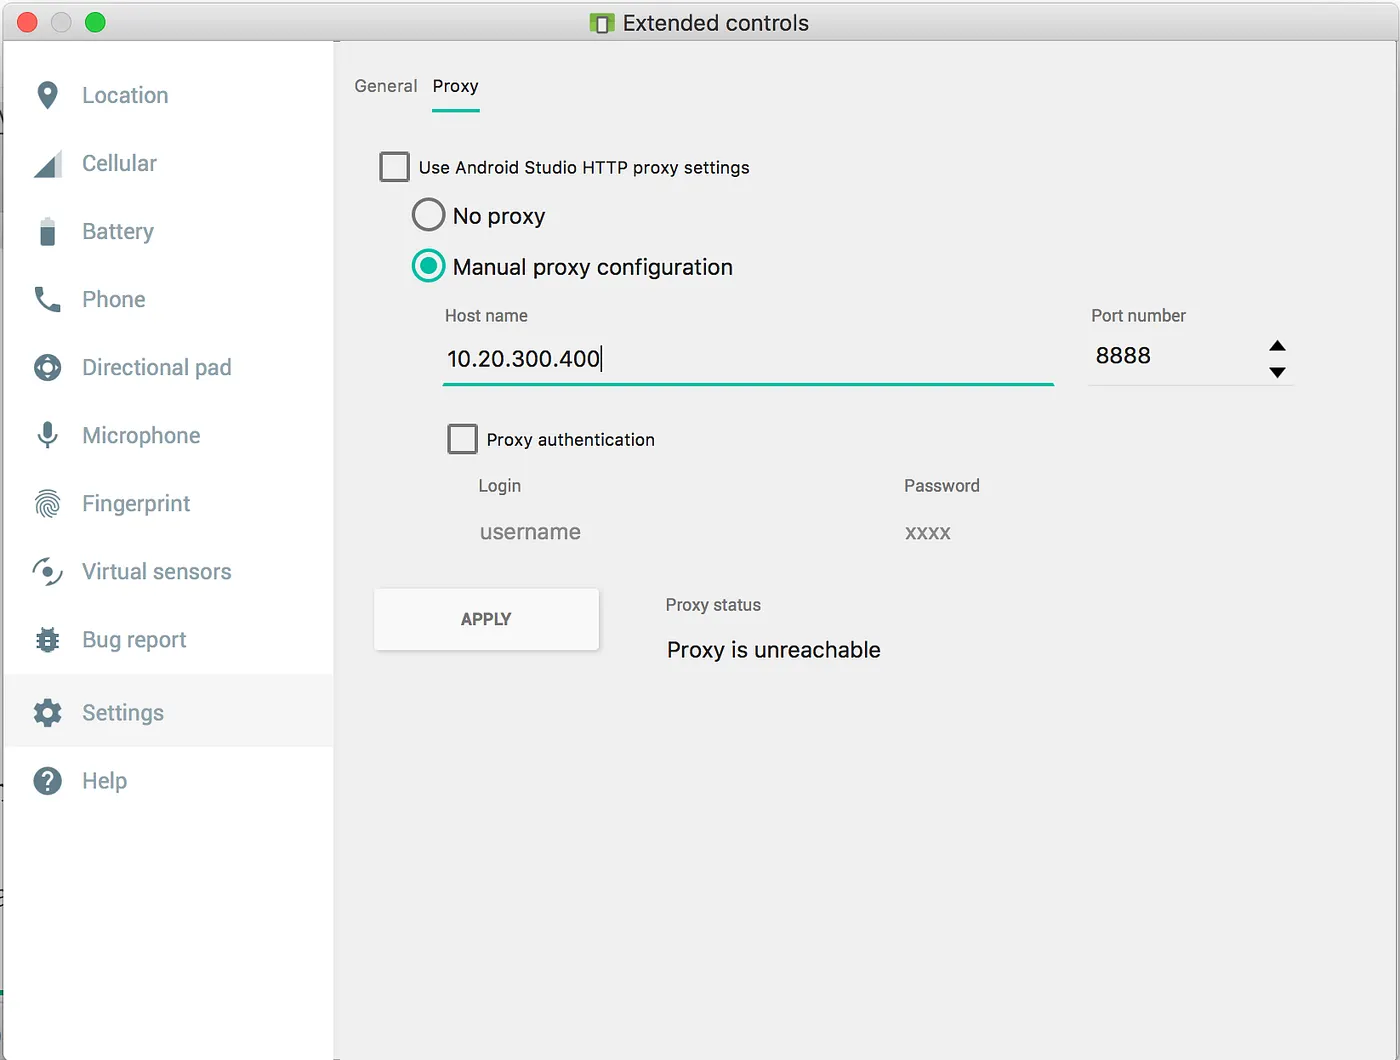
Unlike the above screenshot, you will want 127.0.0.1 as “Host name”, and 8080 as port.
Step 5: Configure the wallet if possible, and create an account
Launch the browser or wallet application with the proxy settings in place, and try to configure the RPC endpoint to use your allowed endpoint without creating an account.
- If you can configure the RPC endpoint before account creation, set
features.chainConfigurability.l1.rpcEndpointConfigurationaccordingly. Then try to create an account, and setfeatures.chainConfigurability.l1.withNoConnectivityExceptL1RPCEndpoint.accountCreationaccordingly. - If you cannot configure the RPC endpoint before account creation, then:
- Populate the wallet feature data accordingly
features.chainConfigurability.l1.rpcEndpointConfigurationshould be set toRpcEndpointConfiguration.NO. - Try to create the account anyway; it may be possible to create it “offline”.
- If you can, then
features.chainConfigurability.l1.withNoConnectivityExceptL1RPCEndpoint.accountCreationshould be set tofeatureSupported. - If you cannot, then it should be set to
notSupported, then:- Restart the browser or wallet app without any proxy settings.
- Create the account “normally”, allowing external requests.
- If you can, then
- Configure the RPC endpoint to use the one that the proxy would allow.
- Restart the browser or wallet app again with the proxy settings back on.
- Populate the wallet feature data accordingly
In either case, you should now have the wallet set up with an account created and configured to use your chosen RPC endpoint for L1. The proxy settings are enabled to enforce that this is the only RPC endpoint the wallet can use.
Step 6: Import an account that has an existing balance
Try to import an account that you’ve already sent Ether and USDC to (using a separate wallet/browser). Populate the features.chainConfigurability.l1.withNoConnectivityExceptL1RPCEndpoint.accountImport accordingly.
If you cannot create an account with the proxy settings enabled, undo the proxy settings and the custom JSON-RPC endpoint. Import the account, and restart the browser or wallet app with the proxy settings and custom JSON-RPC endpoint again.
Step 7: Check your balance
Verify that you can see both your Ether balance and your USDC balance in the wallet. You may have to manually add the USDC ERC-20 contract address to the wallet’s list of known tokens; this is okay and acceptable for wallets to require when running in this mode.
Do not populate the etherBalanceLookup and erc20BalanceLookup features yet; it is possible that the wallet may have cached your balance if you imported the account without using the custom JSON-RPC endpoint.
Step 8: Send an ERC-20 token to another of your addresses
Create a transaction that sends an ERC-20 token to another different address that you own. It is acceptable if wallets show warnings or errors for some of their usual features, such as estimating the fiat cost of gas or of the ERC-20 token being sent, or that they cannot simulate the transaction’s effect. What you are looking for is whether the wallet lets you do the actual token send operation at all.
Populate the features.chainConfigurability.l1.withNoConnectivityExceptL1RPCEndpoint.erc20TokenSend feature accordingly.
Step 9: Check your balance again
Make sure you can see your balances update after the transfer. Your Ether balance should have gone down to due having paid for gas, and your USDC balance should have gone down from having sent some out. Wallets may cache balances (including across restarts), so this helps confirm that the balance updates. If it’s unchanged, go back to step 6 and update the wallet feature data accordingly.
Populate the features.chainConfigurability.l1.withNoConnectivityExceptL1RPCEndpoint.etherBalanceLookup and features.chainConfigurability.l1.withNoConnectivityExceptL1RPCEndpoint.erc20BalanceLookup features accordingly.
You are done! Thanks for contributing to Walletbeat 🫡